The Sound Page in FluidChords2 lets you shape, blend, and control the character of your chords and melodies using two fully independent
sound layers—Sound A and Sound B.
Each layer supports internal engines or external plugins, giving you full freedom over your sonic palette.
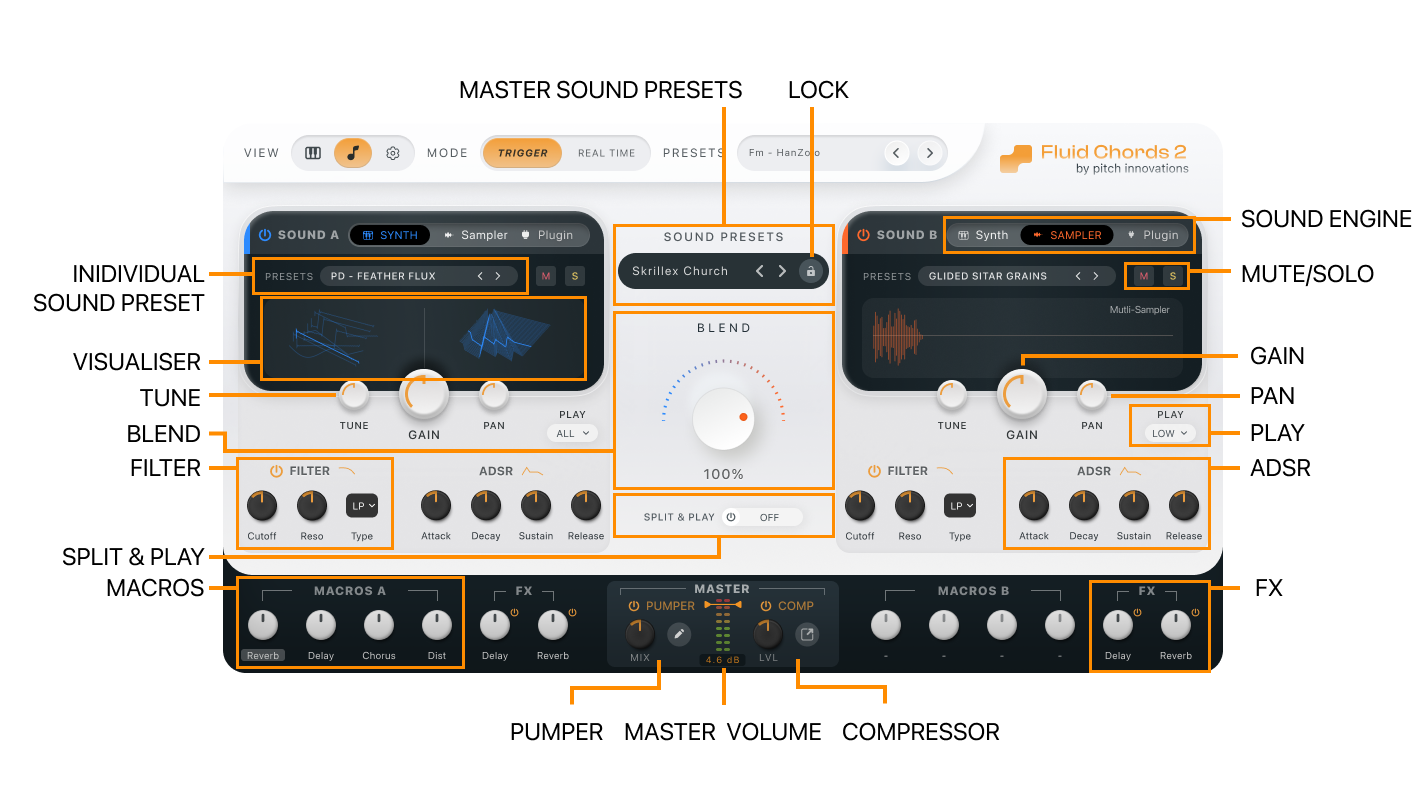
Master Sound Preset
● Save and load full sound configurations across both Sound A and B.
● Use the Lock button to keep the current sound intact when switching plugin Master Presets—ideal for experimenting with chords and
bends while keeping your sound design untouched.
Sound Engines (Available per Layer)
Each layer can load one of the following engines:
● Internal Synth
● Internal Sampler
● Plugin Host (MPE-compatible instrument)
Internal Wavetable Synth
● Comes with a built-in preset browser.
● Includes a wavetable visualizer.
● Features Filter and ADSR envelope for tonal shaping.
● Supports Macros for assigning key synth parameters for live or automated control.
Internal Sampler
● A multi-sample MPE-compatible engine.
● Includes a waveform visualizer.
● Now also features a filter and ADSR envelope, just like the internal synth.
● Does not include macros.
Plugin Host
● Scan for MPE-compatible VST/AU using the Fluid Chords 2 Plugin Scanner. More about it below.
● Load your favorite MPE-compatible VST/AU instruments.
● Preset and parameter control depends on the hosted plugin.
● Still supports core controls like Tune, Gain, Pan, and Play Modes.
Important: When using external instruments in the plugin host, make sure to enable MPE inside the hosted plugin itself. Also, ensure the MPE pitch bend range is correctly set to match the plugin’s capabilities. The default range is 48 semitones. If your plugin supports a lower range (e.g., 24), you can adjust it under Fluid Chords 2 Settings to match the plugin’s supported range.
Sound Layer Controls (Common to A & B)
Each sound layer comes with a consistent set of controls and features at the top:
● Enable/Disable Toggle: Quickly turn Sound A or B on or off.
● Mute: Silences the selected sound without disabling it.
● Solo: Mutes the other sound so you can isolate the one you’re working on.
● Tune: Transpose the sound in semitones.
● Gain: Adjust the volume of the sound.
● Pan: Position the sound in the stereo field.
● Play Mode:Choose how the sound responds to chords:
○ All (Default): Plays all notes in the chord.
○ High: Plays only the highest note in the chord.
○ Low: Plays only the lowest note in the chord.
These controls help you shape each layer’s role—whether it’s handling full chords, just the bass, or the top melody.
FX Section (Per Layer)
Each sound layer includes its own FX panel:
● Delay – Add rhythmic space
Reverb – Add depth and ambience
These are fully independent for Sound A and Sound B, giving you precise control over each layer’s spatial character.
Blend (Crossfader)
The Blend knob in the center mixes Sound A and Sound B:
● Turn toward Sound A to emphasize that layer
● Toward Sound B for more of the second layer
● Keep it centered to balance both
Split & Play Mode
● Enable this option to split the role of each sound:
○ Sound A: Continues to respond to chord triggers
○ Sound B: Bypasses the chord system and plays melodically
This setup is perfect for playing chords with your left hand while improvising melodies with your right, all within the same
plugin.
Master Section
This section processes the final output from both sound layers:
Master Volume:
Controls the overall plugin output level.
Pumper:
● A single-knob rhythmic pumping effect
● Adjust the mix amount quickly
● Click to open the detailed Pumper window
● Includes built-in Pumper presets for fast creative results
Compressor:
● A simple mastering compressor
● Click to open a dedicated Compressor window with full controls
● Helps shape and tighten the output before leaving the plugin