User Interface Guide
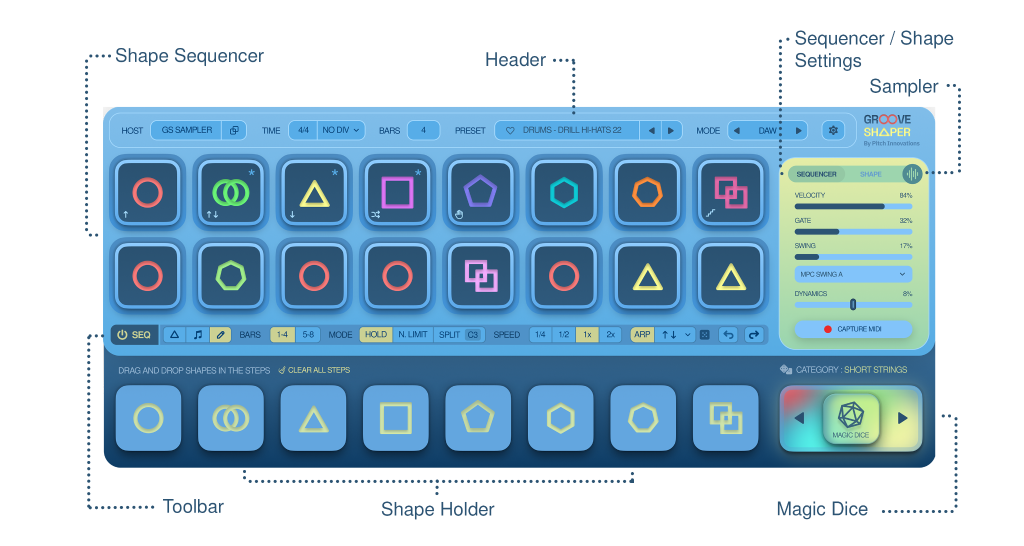
Header

1 – Host – Click here to select your preferred Synth or Sampler instruments.
2 – Time – Click here to reveal a dropdown list to choose your time signature for the Shape Sequencer.
3 – Bars – Click here to modify the loop length of the sequencer. Four steps are equal to one bar.
4 – Presets – Click here to load your sequencer presets. It comes with a collection of factory presets to get you started.
5 – MIDI
-
AUTO (DAW/PERFORM)
– Groove Shaper intelligently switches between DAW and Perform modes based on how you’re using the plugin. When your DAW is not in playback, Groove Shaper enters PERFORM mode, optimizing for live performance with MIDI devices. Conversely, when your DAW is playing, Groove Shaper switches to DAW mode, ideal for working with MIDI clips in your DAW.
-
PERFORM –
This mode is optimized for live playback using MIDI devices. Once the plugin receives MIDI input, the sequencer activates instantly, stops immediately when the MIDI data input stops. The sequencer will reset to the top when MIDI input is not received. This ensures smooth and precise performances from your MIDI input device, allowing for seamless play and stop transitions.
-
DAW –
This mode is specifically tailored for use when a MIDI clip is present in your Digital Audio Workstation (DAW). It starts sequencing upon receiving MIDI signals, similar to Perform mode, but with a distinction: it waits for a brief buffer period after MIDI input. If no further MIDI input is detected during this buffer, the sequencer stops, ensuring clean sequences or playback without overlapping notes.
6 – Settings – Click here to access the settings tab, where you can transpose, select a skin, and modify other settings.

